Saturday, September 29, 2012

Stacked Dimple Rings

 I haven't yet mastered the stacked dimple ring, explained by Crazy Mom here. My stack is curving. I think that's because of the way I joined on the second half of the split ring. I couldn't close the last ring. I think the last stitch must've unflipped. Back to the shuttles I go.

We went to Hartswater on Thursday. Jack's dentist appointment was a failure, but I was happy that I bought some organza for food covers from a very friendly shopkeeper.
Pretty colours, aren't they? The organza is 150 cm wide, so I bought 150 cm of each colour, which I will cut into quarters. I did once make a food cover that was 150 cm square, but that was a little excessive.

Friday, September 28, 2012

Cube Earrings

 More funky than elegant. I realised when I was tatting the tetrahedron that I was making things unnecessarily difficult for myself in the way I was constructing the cube. It's possible to join on the finger tatted section of the SSSR, but it's fiddly and  not strictly necessary for the cube. So here's how I did the cube for the earrings (This is not a substitute for Andres Mancenido's excellent tutorial, it's an extra guideline to the cube specifically)

R1: 4 beads on back of hand, shuttle tatted *Bead 1-2-2-1, repeat 4 times
R2:  2 beads on hand, side 1 joined to R1, Side 2, shuttle tat, bead in position, side 3 finger tat, bead in position, side 4 finger tat
R3: 1 bead on hand, side 1 joined to R2, side 2 joined to R1, side 3 shuttle tat, bead in position, side 4 finger tat
R4: as for Ring 3, joining to appropriate edges
R5: Side 1, shuttle tat, sides 2 -4 shuttle tat, joining as you go.
R6, shuttle only, joining all sides.

Ok, enough of this now. This is my # 2 for the challenge.

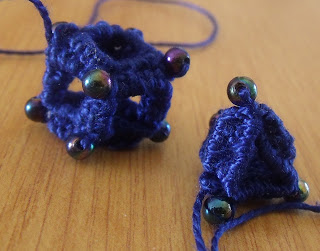
Aha, a Cube


Albeit a rather wobbly one. And a tetrahedron, also rather wobbly. It's quite difficult to get the tension the same on all the faces. The first ring tends to be bigger and looser than the ones that have joins and are looped around beads.  I guess it's a matter of practice. See yesterday's post for a link to the tutorial I used to make these. I'm not sure how many practical applications they have, but I'm thinking of making cube earrings.

Wednesday, September 26, 2012

The Third Face


Thanks to LadyTats, I can give you a link to the tutorial I'm using to tat a cube. Faces one and two were relatively straightforward. But for the third face, you need to finger tat the fourth edge, as a Single shuttle split ring, to make sure that the thread is in the right place for the next face. Hmmm. I struggled with that. I gave it some thought as we drove to town and managed it when I got home again. The neat thing is that when you close the SSSR, you use the bead as an anchor to prevent it from disintegrating. Clever. Face four is the same as face three, so that was no problem. But face five requires finger tatting on two edges. My first attempt is a mess. I hope I can remove it without damaging the first four rings. I was making very slow progress when I kept starting from scratch each time I made a mistake!

Tuesday, September 25, 2012

Joining the Challenge

I've joined the 25 motif challenge. What I want to do, is to challenge myself to try different techniques that I either haven't used before, or have struggled with. Like the layered tatting I used yesterday. So I count the earrings as my #1 for the challenge.

Months ago I downloaded a PDF called Single-threaded Tatted Platonic Solids Tutorial. Phew. Daunting name. It's a tutorial by Andres Mancenido showing how to create 3-dimensional geometric shapes - cubes, pyramids etc. I don't know where I downloaded it from, and I can't create a link, but In-Tatters is mentioned as a contact, so anyone interested may be able to find it there. The tutorial shows the principles for creating any such platonic solid. The tutorial is clear, but it might have been easier for a beginner if it showed specific directions for one solid to start with. I'm working on it, but I realise that I need to get my head around getting the planes right in relation to each other. This first attempt will have to be abandoned -  it's not going to turn into a cube with a bead at each corner - but I have learnt a lot in the process.


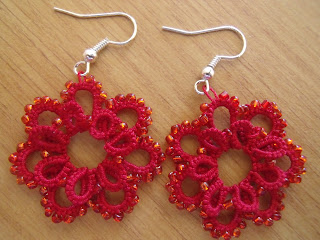
Layered flower earrings


I used the same pattern as yesterday, Jennifer Williams's Flower using two layered tatting, only I used beads instead of making picots on the big rings and added beads when joining the picots on the small rings. I also used size 40 thread instead of 20, to make them a reasonable size for an earring. Each one is about 3cm across.

Monday, September 24, 2012

Layered Tatting


I like the look of layered tatting, where the layers are created simultaneously. The flower is by Jennifer Williams. The butterfly is from Mary's blog. It's interesting that the joining is not the same in the two pieces. In the flower, the small rings are joined to each other. In the butterfly, they are joined to the large ring behind them, with the next large ring joined to the same picot. But the effect is much the same.

Friday, September 21, 2012

Lost: my connection to the world

I think it's pretty amazing that I can be in rural South Africa and connect to the whole world via internet. But the connection is tenuous. Yesterday the aerial that receives our internet signal was blown down by the wind.   The aerial serves a group of farmers, not just us, so I guess there was a lot of squawking. The ISP man hastened out the 50 kms from town to sort it out. He was only partially successful and will have to come back today to finish the job, but he did make sure we were connected to the world again. Thanks Debruyn.

I've spent the last two days cleaning -boring for me and beyond boring to anyone else! So I thought I'd show you a picture from my archives. Jess from Tat-ilicious had a post a few days ago about using Jane Eborall's diamond pattern to look like a block or box. A few years ago I did the same, only more so, to make 'tumbling blocks'. Here's a link to the diamond, a very versatile pattern.


Thursday, September 20, 2012

A Nonevent

On our weekly trip to town yesterday, I planned to buy more organza to make food covers. There was a wide range in the shop and I spent a pleasant 10 minutes deciding which colours I wanted. Yellow might make the food look odd. Pale pink is pretty. Blue or turquoise? Then I needed someone to cut it for me. I stood around for a while. Then I went to the curtaining department, where three shop assistants stood in a huddle and asked them for help. One of them shrieked, 'Rachel' and when that had no effect, told me to go to the back of the material department and see if anyone was there. I did, and then I stomped out of the shop without any organza. If they can't be bothered, neither can I. Problem is, there isn't anywhere else in town I can get it. I'll have to wait for the next trip to Hartswater, I'm sure my favourite little wool/material shop there will have what I need. In the meantime I'll go back to sewing the edging to my tablecloth.

Here's a picture of a food cover I made several years ago, just for some eye candy.

Tuesday, September 18, 2012

Roses Are Red, And Yellow Too

Another food cover ( I'd better abandon teashower, since I can't find it in any dictionary). The rose is by Victats. I think it's very clean and modern, perfect for this project, and the pattern, called Roses are Red...,  is clear and easy to follow. Thanks Victats. I used size 20 thread for a rose in each corner and size 10 for one in the centre. The butterflies, (can you guess?) are Jane Eborall's very small SCMR butterfly. I did them in lilac to link with the dangley beads at each corner. The beads help to keep the cover in place. The edging was done on my sewing machine. I like the idea of combining machine embroidery and tatting.

Monday, September 17, 2012

Holiday Knitting


I started this top when I was away, but  finished it after I came home. It's the same pattern as the top I made for Isabel. The colour in the photo doesn't look right! The label of the 4-ply cotton says moss, though I think it's more pistachio - either way, it's a distinct green. The top is shorter than I visualised. The pink top I knitted myself used 7 balls of yarn. It was knitted on 2mm needles. This one is knitted on 4mm needles and is a more open pattern, so I thought 5 balls would be ample. No. 6 balls would've been better.

More Recycling


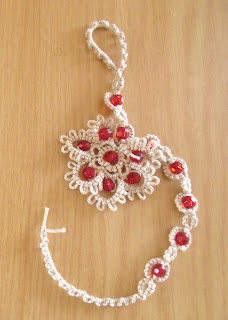
I cut two more 'Lady Hoare shuttles' from a thicker plastic. I think it's an improvement, they are firmer and easier to hold, though they won't win any speed contests. I used them to tat the second barefoot sandal. Of course I had to make the sandal match the other one, shown here, so I haven't yet tested doing a sandal in one pass.


Now I just need summer to arrive so that I can go barefoot!

Saturday, September 15, 2012

Recycling


Thanks for all the comments and suggestions on yesterday's post. Monica pointed out that I had wound the thread in the wrong direction! Oops. Thanks Monica. This morning I cut a shuttle from an old bleach bottle. Not very elegant, but it does seem to work. I didn't find it necessary to use LadyTat's tip to do a half hitch round a prong, as I did with the clay shuttle,  but I will keep it in mind.

Here's why I need a bigger shuttle for this 4 ply cotton:

Because Jon's daisy pin is made with only chains, and the rest of my barefoot sandal was split rings, I thought I could fit enough thread onto normal shuttles to complete the sandal. Nope. I couldn't finish the strap around the ankle. Plan B is to make another strap from the left and tie at the back of the ankle. But I would like to be able to make a sandal without joining in new thread.

Friday, September 14, 2012

Failure


The artificial clay is too brittle for a tatting shuttle. It broke! I think my shuttle was probably too rough too, though that's not the clay's fault, I could've smoothed it. I'll have to find another material to make a Lady Hoare type shuttle.

Thursday, September 13, 2012

LadyTat's Suggestion


Yesterday I went to the local craft group meeting and played with clay. Well, it wasn't really clay, it was an artificial substitute called Gold Mile. It can be rolled and cut, shaped and manipulated, but doesn't need to be fired. It can be painted with acrylic paints too but, luckily for me, doesn't have to be.

This morning I thought, hmmm, I could perhaps use my left over clay to make the 'Lady Hoare shuttle' that LadyTats told me about. In a comment on my post about using 4 ply cotton for tatting, LadyTats gave me a link to a shuttle on etsy that I could use for tatting with thick thread. The ones on etsy are wooden, but I thought I might be able to copy them in the artificial clay. I rolled it out, then rolled the tatting onto the clay to mark it and cut the shuttles out. Now I must wait for them to dry before I can try them out. Thanks LadyTats.

Wednesday, September 12, 2012

Another pair of earrings


I made another pair of earrings using the little shell discs, a bit more elaborate than the previous ones. It's a shame that the discs have a right side and a wrong side. You have to be sure to get the hooks facing in the right direction.

Tuesday, September 11, 2012

Market Bag Tatting


The thread I used to knit the Market Bag is 4 ply mercerized cotton, Elle Premier, made in Bulgaria. Far too thick for tatting, of course. But so smooth and tightly spun, it was tempting. Why not give it a try? It works fine, though I won't get much tatting from one bobbin. It's interesting that the work doesn't curve as much as with finer thread. I assume that's because it's difficult to pull the stitches really tight? How about adding beads?

Yup, that works too. I'm thinking this thread might work for barefoot sandals. I'd better find my biggest shuttle.

Sunday, September 9, 2012

Lining the Market Bag


The blurb on the Market Bag pattern says its stretchiness is a virtue. But I didn't like the way the bag sagged when I put my purse into it. I also didn't like the way the handle curled. I thought that lining the bag with fabric might overcome these problems. I hurried and scurried to finish knitting the bag before I went away, but then had to wait until I came back to do the lining. I think it works. The bag lining is loose, the handle lining sewn to the knitting with back stitch.

Monday, September 3, 2012

Market Bag


This is the pattern for which I originally went looking for cotton yarn. I was a bit distracted by bright pinks and purples, but I went back to it eventually. It's also the pattern for which I practised brioche stitch. The pattern is 'Chevron Market Bag' by Kristen TenDyke. I downloaded it as a free download from Interweave Press, though it originally appeared in Interweave Knits magazine Spring 2010. I still have to finish the strap and make an i-cord for fastening, but I'm nearly there.

I'm going away for a few days - not to Tat Days, unfortunately! Much closer to home. 1st September is officially the first day of spring in South Africa, I hope the weather will be spring-like. We had frost yesterday morning and this morning, winter is reluctant to leave.

Saturday, September 1, 2012

Two Earrings

Earrings are like socks - you must make two and they must be reasonably similar! I had to 'go around again' with the second earring, I made the beaded chain too long the first attempt. I like the way the different circles hang at different angles to each other.

I hate the word verification that is found on some blogs - I don't want to prove that I am not a robot. So I was mortified yesterday to discover that my blog was using it. Luckily Jane Eborall not only let me know about it, but told me how to get rid of it. I hope that's the end of that. Thanks Jane.