Monday, July 31, 2017

Collaboration

A friend of mine, Carien, asked me if I'd help her crochet a blanket. She wants it finished before Summer. The days are beginning to lengthen, Summer is on its way, so we had better get on with it. Carien bought yarn in shades of blue. First step was to decide on a colour scheme and stitch count. Then we each made a square and measured it so that we can work to the same tension. So far, so good, we both have squares that measure 13 cm across.  I'm not sure how big the blanket is to be, but I'll work until I've finished the three balls of yarn I have.

Friday, July 28, 2017

Zigzag Bracelet

I've finished the zigzag bracelet. It took me a while, but I learnt a lot in the process. Note to self, another thing I learnt is that a rope with a bigger circumference is stiffer. When this blue bracelet was stiff, I thought the thread must be thicker than my usual thread, but now I realise it was just because of the bigger circumference. Aha.

Thursday, July 27, 2017
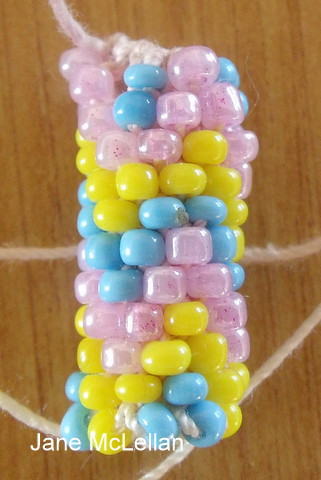
Zigzag Progress

It looks as though I've reversed the zigzag pattern on successive repeats, but in fact it's the same sequence repeated over and over. I'm sure there's a logical, mathematical reason for that, but it boggles my mind!

Thanks to crafty sylvie who gave me the tip to include some white in a photo to improve the colour. The photo above was taken with my camera, here's one taken with my phone:
I think it's better than the one I took yesterday, so I'll keep that in mind in future.

Tuesday, July 25, 2017

One Solution


One solution to yesterday's zigzag conundrum is to separate the zigzags. It still took me three attempts to get it right, but I think this will work. I might give it a go, using different colour zigzags against a constant background.

My camera battery died this morning. I wanted to write this before I go to town, so I decided to use the camera on my new phone instead of the camera. Hmm. The camera has 13 megapixels and the picture is clear, but I'm disappointed in the colour. It has a blue tinge, where the camera picture is clear. I wonder why that is.

Deconstructing the Pattern

I decided to see if I could sort out the pattern that was faulty. (By the way, the link to the pattern on a Russian site no longer works, so perhaps the designer realised it's not a good pattern) I'm a beginner at beaded crochet, so this was rather rash. Patterns are tricky because what you see is not what you get. Beads are pushed slightly to the right as you work, so the grid that shows you which bead to put where doesn't look like the final result. A zig and a zag looks like this:
Anyway, I gave it a go. I started by drawing the pattern from scratch. Hmm. What happens is that at some point the repeats run into each other and you end up with 4 beads of a colour in a row, which disrupts the zigzag pattern:
I revisited the original pattern and removed one row of the chart, so that the second repeat would follow on from the first. The designer has made adjustments to compensate for the effect I've described:
I don't like the look of that. I thought perhaps I could make the circumference 10 round instead of 9, but that doesn't begin to work. It's a fatal flaw. Or do you think you could carry on regardless?

Monday, July 24, 2017

A Beaded Rainbow

This is a much better pattern, which can be found here. I would have liked to have done one more repeat, but I ran out of orange beads. I had counted the remaining orange beads carefully, but didn't take into account that a few of them had holes too small for a beading needle to go through! No problem, I think it's long enough to make a necklace for a small girl.

I did learn that size matters. You can crochet different size beads together, but it shows, so is best done for effect. When I worked a trial piece, I chose beads purely on their colour. The light green ones are slightly bigger than the others, and the red ones slightly smaller:
I didn't like the unevenness this caused, so I changed beads for the final version.


Saturday, July 22, 2017

Pattern Pitfalls

I'm grateful to all the designers of beaded crochet ropes who have made their patterns available online. Without them, I'd not have been able to learn the craft. But patterns are not all created equal. Yesterday I printed out a pattern that showed the sequence for stringing the beads, but not the draft of the pattern showing which bead goes where. No problem, I thought, I'll make my own draft. I worked one pattern repeat, it looked good, so I spent a couple of hours stringing several repeats. I should have looked more carefully. The pattern repeats didn't follow on from each other. It wasn't going to work.
I spent half an hour this morning unstringing beads. My advice would be that before you print a pattern, make sure it has Draft, Corrected, Simulation and Report, or at least Draft, Simulation and Report.


Friday, July 21, 2017

Five Lizards


Or perhaps geckos. Can you see them? They look as though they're clinging to the bracelet. I thought this pattern was fun. It's only 6 beads in circumference, so it's pretty easy. At first I put them nose to tail, but then the lizards were really hard to see, so I put a space between them. The space could've been greater.  Here's a link to the pattern.

Thursday, July 20, 2017

Testing The Idea

I spun a bit of wool and  dyed two shades of brown, similar to the colours used in the original pattern, Beret Cup Cake Rose by Wedina Schmidt. The beret has white in its outer rows, which is why I've used white to join the hexagons. I think hexagons do show the flower pattern better than squares, thanks for all the feedback. I'll take these along to the next craft group meeting and run it past the experts. Fingers crossed they don't think it'll be too outlandish for the rather conservative judges.

Monday, July 17, 2017

Trellis

I did this one just for practice. I like the contrast between the colourful flowers and the black-and-white 'trellis'. The pattern is by LBeads and is here.

Mulling

I visualised a scarf with raised 'petals' to match the beret. I crocheted several swatches, but soon discovered that front post crochet creates a rather stiff fabric. That's fine for a beret, but not so good for a scarf, which requires more drape. I decided to take a look at Ravelry. I typed 'crochet scarf' into the pattern search and came up with 386 pages, with 50 odd patterns per page! After a couple of hours of browsing and scribbling down possibilities, my eyes glazed over and I decided to read tatting blogs for a break. On muskaan's blog there's a link to a crochet blog called ergahandmade Crochet, and there I found what I was looking for! I think. The pattern is not for a scarf, it's for a woman's top, but it uses a hexagon motif with a 12-petal flower, just as the beret has a 12-petal flower.
I crocheted a sample and in the process realised that the motif could easily be changed into a square by working four corners instead of six. Squares would be easier to join, though I did see scarves on Ravelry made of hexagons. I'm hoping I can use colour to reinforce the connection between the flower on the beret and the more lacy flower on the scarf. I'll need to spin and dye a couple of skeins to test the idea.

Saturday, July 15, 2017

Delivered

I finished Isabel's blanket at the beginning of March and posted if off to her on the 5th. I remember hurrying to get to the Post Office before it closed for the day.  The blankets I posted to New Zealand took about three weeks to arrive, so I hoped that Isabel would get hers in Perth, Australia, before her birthday in early April. Mmm, no. It was delivered on Thursday, more than four months after I posted it! I'm just relieved that it has been delivered.  I was beginning to wonder whether I'd best start making a replacement. Now I must post Annika's blanket. I have no confidence that it will arrive before her birthday at the end of August!

Friday, July 14, 2017

Back To The Drawingboard

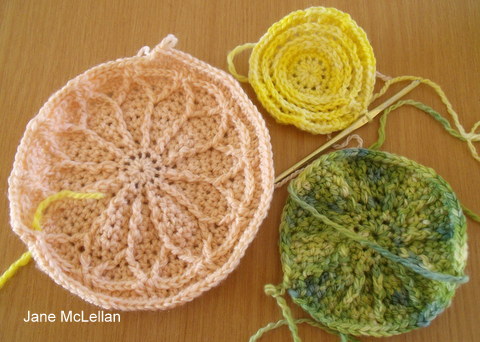
I took my beret to show the craft group. The fundis gave it the thumbs down. They said they don't think it's what the judges will be looking for. They want something warmer, something made in wool. That's fine; that's exactly why I asked for advice. Now I'm looking at a pattern called Beret Cup Cake Rose by Wedinas, that I found on Ravelry. First step is to practise some techniques that I'll need for the pattern, such as crocheting into the second back loop of a stitch, and crocheting a 'front post double crochet':
The green one is much too stiff, so I will have to spin a yarn like the peach one, not like the green one. Before I begin to spin though, I had better see if I can work out how to turn the beret pattern into a pattern for a matching scarf.  

Wednesday, July 12, 2017

Slow!

Crocheting with plarn (plastic yarn) is a slow business. Perhaps my hook is a bit small for the job.  I had visualised making the whole shopping bag in trebles, like the bottom of the bag.
But eventually I got fed up with the slow pace of progress and decided to work a mesh pattern instead.
I probably should have found a pattern to follow because I'm struggling to get the sides of the bag even. When I was working in all trebles, the circumference seemed to be getting bigger and bigger. Now in mesh, it's getting smaller! The plarn is difficult to unravel, so I've just been compensating as I go along, which gives a rather wobbly result.

Tuesday, July 11, 2017

Magic Square #2

This is Robin Perfetti's second magic square. You can find a link to the pattern by clicking on this post on Tatting by the Bay. I used size 40 Coats thread for this one, it measures 14 cm across. There are a lot of lines of symmetry in here!

Monday, July 10, 2017

A Better Way

The 'magic trick' I described in my last post is not the best way to turn a plastic bag into 'plarn'. StringyDogs sent me this link to a tutorial showing a better method. I'll show it here, using a small plastic bag, though you'll get more detail by clicking on the link.
Cut the bag in strips, stopping just before the end. Then arrange the bag so that the uncut section is flat on the table:
Cut diagonally from one strip to the next, rather than straight across:
Then the bag will form one continuous strip:
Aha! Now I need to actually make something with plarn. I knitted and crocheted samples:
I'm thinking of crocheting a shopping bag. I must say it's rather noisy stuff to work with. I want an evening project, but rustling plastic is not the best accompaniment to an evening film!

Saturday, July 8, 2017

Recycling Magic

There were interesting comments on my earlier post about turning plastic bags into plarn. Some referred to ways of using plarn - sleeping mats, shopping bags... Stringy Dogs commented that there is a way of cutting bags so that they form a single big circle, rather than a lot of little circles. She didn't give any details. But I remembered a 'magic trick' that we used to do as children, folding and cutting a piece of paper in such a way that it opened into a big circle that could be put over your head. Several bags and pieces of paper later, it was clear that I had forgotten how to do it! I looked up on the internet and found this post. Aha. So I cut the bottom and handles off a bag, then cut one side open, so I had a single, folded piece, and cut from this side and that:
The middle bit on each 'pair' has to be cut, (except the first and last!) otherwise you get a concertina shape:
And then it can be opened up into a big circle:
It's a bit jagged and I'm not sure it's the most practical way to cut the bag. And it's probably not what Stringy Dogs was thinking of! But there you go, it's possible.

Thursday, July 6, 2017

A Lot of Error!

I'm trying to turn Anne Bruvold's  flowery triangle into a magic square. There are a lot of scraps and a lot of 'Duh, of course that won't work' moments, but I am making progress. I scribbled the diagram down years ago. Anne didn't provide a pattern but gave permission for her motif to be copied.

Wednesday, July 5, 2017

More Magic

I finished Robin Perfetti's Magic Square #1. Then I had some failed experiments before I turned Jane Eborall's square pattern into a magic square, joining four squares in one pass:

I think this means I've grasped the principle!

Tuesday, July 4, 2017

Recycling

A recent newsletter from Interweave Press had an article about 'plarn'. That's a portmanteau word combining 'plastic' and 'yarn'. It showed how to cut plastic bags up and turn them into a form that can be crocheted or knitted or whatever. Woven perhaps. It wasn't quite as easy as it sounded. The bag is folded and cut into strips that are actually loops, and then those loops linked together. You have to be careful joining them that the two sides are even. On my first attempt I cut the strips too wide. I forgot to take into account that in the plarn, the plastic is doubled. I made the next batch half as wide and that worked. I haven't made anything with plarn yet, but I can see it has possibilities.

Monday, July 3, 2017

Working Magic

Robin Perfetti of Tatting by the Bay has been exploring magic squares and kindly sharing her discoveries with the rest of us. A magic square is a 'pathway' that enables you to work a square of any size in a single pass. Robin has created a PDF which I'm following. There's a link on this post.  But while I'm working on these squares I'm keeping in mind Robin's next post, deconstructing magic squares, with an eye to creating my own magic square. I've tatted a magic square before but didn't understand the process well enough to be able to branch out. I'm now looking out for lines of symmetry and I think I have it! Thanks Robin for explaining so well!

Saturday, July 1, 2017

Bindweed


Up until now, the patterns I've used for beaded crochet ropes have had small, geometric repeats. But there are a lot of more 'pictorial' patterns out there. I thought this one might be a good place to start as it's only 7 beads around and I had the correct coloured beads available.  The pattern is called Bindweed and is by Nazo Design, whose blog can be found here.