Thursday, January 31, 2013

Daisy, daisy

 I thought I might be able to use the sunflower pattern to make a daisy. I  used size 20 white and size 40 yellow thread. I had to experiment to get the petal spacing right. I thought the third one along was a bit crowded, but actually it does look like a Michaelmas daisy flower.

Wednesday, January 30, 2013

Sunflower Pattern

Susie asked me to give the stitch count for the sunflower, so here it is:

Sunflower in Maltese Tatting


To make the flower, it’s essential to know how to make Maltese Rings. This flower uses Martha Ess’s directions, on her Tat’s Amore website.  This is her ring #3, with a ring inside the Maltese ring.
Materials
2 shuttles, one wound with size 10 yellow thread and the other with size 20 brown thread. Add 30 very small beads to the second, (brown) shuttle. (that's slightly more than you'll need)
Method
Tie threads together, make loop with yellow thread. The first half stitch is made with both shuttles, as per Martha’s instruction.
Shuttle 1: 1, long picot, 2
Shuttle 2: slide a bead close to the work, 2
Shuttle 1: long picot 3
Alternate shuttles until there are 6 yellow ‘petals’.
Inner ring
Reverse work and drop yellow thread. Using shuttle 2, put 6 beads on the back of the hand. Make a ring: 1, then slide bead from core thread and from shuttle thread, 1. Repeat until 3 beads from core thread used. Then make small picot, adding bead from shuttle thread below it. Continue with ring, adding bead from core thread and from shuttle thread between each stitch, until all beads on core thread used. (Note, see Jane Eborall’s Winsome drop earrings pattern for this method). Close ring.
Petals continued
Go back to the yellow thread, and continue as before, with long picot, 3 yellow followed by bead 2 brown until there are 5 petals on second side. Work brown stitches and then join to the picot on the inner ring. Finish with yellow, working second half of the last stitch with both shuttles. Close.
Voila!

Day 7 and Gloria

Jack thinks it's a teapot. Who knows?

This is Martha Ess's Gloria bookmark which uses Maltese rings. They remind me of the seeds of a mukwa tree. Since that probably doesn't mean much to most people, here's a link to a picture of a mukwa tree seed.

Tuesday, January 29, 2013

Sunflowers

 Tra-la. I had the idea of using beads to represent the seeds in the middle of a sunflower a long time ago, but I couldn't get it right in practice. Here's one answer. This is Martha Ess's technique number 3 (see yesterday's post for link). There are beads on the inner picots, and beads on the centre ring. The yellow thread is Milford Satin 2-ply. The brown is Cebelia no. 20 that I dyed myself.

Monday, January 28, 2013

Maltese Rings

 On to my next challenge, Maltese rings. I used Martha Ess's instructions. They're clear, and show three versions of the technique. Then I did my own variation by adding beads to the inner ring. That may be just what I need for a sunflower that I've been imagining for some time.
Hmmm. Needs some work, but definitely has possibilities.

Sunday, January 27, 2013

Scissor Catastrophe and Day 6


I can't believe I broke the handle of my scissors yesterday. I've had them for 25 years and use them for everything! They owe me nothing, that's for sure, but I shall be lost without them. Jack glued the bits together for me, I hope that'll hold until I can replace them.

Day 6 of the TIAS reminded me that split rings don't have to be symmetrical. No, you can make the rings go this way and that way! Joining on the second half of a split ring can be tricky. I used to just join with the shuttle thread, until I realised that can create distortions. I think the trick is to make sure to pull the core thread back right through the picot. Otherwise the ring won't close.

Saturday, January 26, 2013

Five


That's five of Renulek's motif, not day 5 of the TIAS, which I did on Thursday. Onion rings have a right side and a wrong side, or is that just me??

Friday, January 25, 2013

Day 5

Hmmm. I wonder where we go from here?


I spent the morning making fig jam and chutney, using figs from a neighbour's tree.

Wednesday, January 23, 2013

Two More


I don't think this would be a good pattern for multicoloured thread, so I've used solid colours which will show the pattern off well. All of them are Milford thread, though the red is size 40, the others size 20. It would've made sense to use size 20 for them all, but I couldn't resist the red!

Julia Sanders

Frivole has been working from the Pricilla no. 2 book or Julia Sanders Tatting book. In my previous existence as a tatter, I used this book a lot. So I thought I'd show you the collar on net that I made  for myself. I made one exactly according to the pattern for a friend, then made some alterations to this one so that it would be a bit different. I'm glad to hear that the book is now available on line. Thanks to Frivole for the link.  I also made the collar shown on page 13. When I was given the book as a present, it blew my mind! It was so different to the Coats booklets that were the only patterns I'd had access to before that. It probably wouldn't have the same impact now, but nevertheless, it's worth looking at.

Monday, January 21, 2013

In Blue

 It's really time to go on to the next challenge, but I like this motif by Renulek so much I've tatted it again in blue. I'm contemplating make 5 motifs for a food cover. One for each corner and one for the middle. The next challenge will have to wait for a bit.

Day 4


My Catherine Wheel joins are  not as neat as I would've hoped. I tied myself in knots trying to undo them, so decided to concentrate on improving them as  I went along. Phew, there are a lot of tatters doing the TIAS this year. Hats off to Jane for keeping up with us all!

Sunday, January 20, 2013

More Onions


Frivole and Fox have both recently tatted this motif by Renulek.  It was just what I was looking for to practise onion rings. I like the contrast between the 'solid' centre and the more airy second round. I like the 'hanging rings' too. Thanks Renulek.

Friday, January 18, 2013

Day 3

 Well, it's still looking like a pyramid, but I know that Jane's creations can turn into the most surprising things!   I think my second split chain is neater than the first, so I'm pleased about that.

Wednesday, January 16, 2013

Stress Buster

Jess's Tat-ilicious post on Monday gave me an idea for dealing with tension problems in onion rings. How about using a finer thread for the inner ring and a thicker thread for the outer? The black and red motifs use size 40 and size 20. The top motifs use size 20 and size 10. I think it works, makes it possible to tat without having to pay too much attention to tension.

Tuesday, January 15, 2013

Day 2

 I didn't have much time for tatting yesterday, but I did manage to get day 2 of the TIAS done. I took the intrepid route - I thought it would be a bit feeble if I didn't, given that I'm in the middle of a campaign to learn new techniques! I was pleased with how smoothly it went, I didn't even have to look up the instructions again. Practising Catherine Wheel joins has helped with split chains too. What is it? One of those South American pyramids perhaps?

Onion Rings

The tenth in my challenge to learn new techniques is the onion ring. Some of the instructions I looked at showed chains around a ring, but that wasn't what I was looking for. Shouldn't onion rings be rings around rings? As per Jane Eborall's instructions. Jennifer Williams's  directions were for chains around a ring, but they did give extra clues about making the 'onion ring join' that were helpful - move the shuttle thread out of the way when picking up the thread round the hand, and put the shuttle through from back to front. One thing I did battle with a bit was tension. I had to make the inside ring very tight and the outer one looser. The butterfly and edging come from Georgia Seitz's website. They were tatted by Hope Green. I don't feel quite confident with onion rings yet, I'll work on them a bit more.

Sunday, January 13, 2013

My Best Shot

The sweater is knitted in the round, so I don't have to sew the pieces together, that's good. But getting the underarm neat is really not easy. I've done the best I can. It certainly looks better than first time around. If the judges of the competition criticise it, I will at least know that I gave it my best shot!

Friday, January 11, 2013

What price your labour?

I spent much of yesterday making sheets and pillowcases. Really, it would be more sensible to just buy sheets and pillowcases. I asked the lady in the material shop whether it was worth one's while to make sheets. She said, 'It is if you make them yourself, but not if you pay someone to make them'. Which means, in effect, that I am belittling my own time and energy. Oh well, it was an easy job, and these sheets are better quality than the ones I bought a few weeks ago. Which reminds me: I was briefly tempted by Egyptian cotton sheeting, but it was very expensive. There's quality, and then there's extravagance!

Unyoked and Day 1

 One thing about knitting, it's easy to undo! Just pull and wind and that elaborate pattern will be reduced to small balls of yarn. Sigh....

On a more positive note, Jane Eborall's Tat-it-and-see begins today. Great fun. The pattern is released in small stages, with no hint of what the final product will be.  I'm not much good at guessing, I have to say, and at this stage it's too early to even attempt a wild guess. All I do know is that it will be something interesting!
The thread I'm using is Jess's tat-ilicious key lime raspberry parfait.

Thursday, January 10, 2013

December Motif

Yes, I know it's January, but I thought that Frivole's  motif would be good to try out my new shuttle. I did larkshead picot joins in the middle. Interesting how they look interlinked. I think that's because the picots are so close to each other. Frivole's original has 'invisible' joins in the middle, but I quite like the effect of these. The thread is Tat-ilicious key lime raspberry parfait

Wednesday, January 9, 2013

My New Shuttle

Isn't it beautiful? Jack, my husband, took my aero post shuttle to a jeweller in town and asked him to copy it. We collected it this morning. It works fine and has a lovely weight. This, of course, is the shuttle to go in the beaded shuttle bag.

Tuesday, January 8, 2013

No, no, no

I was very excited about finishing my fairisle jersey this morning. The multicolour yoke looks good. The neck is neat. But, when I came to the underarms, things fell apart. I grafted the 11 stitches as per instructions, but there are ugly gaping holes on each side of the graft!! There must be some trick to this that I don't know. This just won't do for a knitting competition. Oh dear me. I haven't yet decided what to do.

Monday, January 7, 2013

Failed Monogram, Completed shuttle bag

 My idea was to create a beaded monogram. I made a pattern and set off. But I'd forgotten that the rows of beads are staggered. It won't work as I envisioned. An abstract pattern using different coloured beads is easy enough though. The other thing I got wrong was the order that the beads should be threaded. I was thinking that the beads had to be threaded in reverse order. Not so, but far otherwise. Because the beads go forward, as it were, onto the thread, backward onto the shuttle and then forward off the shuttle, they must be threaded in the same order they'll be tatted.

I have finished the shuttle bag. Thanks to Marie Smith and Frivole for the pattern. Later this week I should have a special shuttle to go in it. 

Saturday, January 5, 2013

A Flat Version

Fox's comments yesterday started me thinking about making a flat version of Marie Smith's beaded 'fabric'. First design problem to think about: on row 3 the second shuttle for the split ring will be on the wrong side. A single shuttle split ring should solve that. If there's a SSSR on one side, I may as well do the same on both sides and work with one shuttle.  Then to decide about the foundation row. I thought of just doing rings of 6ds, but that wouldn't be very stable. They need to be joined to each other.

I wound a shuttle with thread and beads and began. Turns out you can't add a bead to the opening of a SSSR.  Do a SSSR without a bead? That didn't really work, because it stuck out too much. A bare space of thread? Bit boring. How about adding a bead to that? Yes, that works fine.

Then I struggled with the foundation row. On the first attempt, it looks as though there's an extra ring sticking out. A ring without a bead? No. Same solution as before, just a bead on bare thread.

Because the rings join onto the spaces between the rings of the previous row, it's important to watch that you get the same number of rings in each row. The solution is to join the last ring to the beaded space.

I think this works, but I'd be happy to hear any suggestions for improvement.


Friday, January 4, 2013

The Ninth Challenge


I'm making a beaded shuttle bag. The pattern is Marie Smith's, but it can be found on Frivole's blog. I've worked with beads before, of course, but not quite like this. It took me over an hour to prepare the shuttles according to Marie's instructions.

The yellow shuttle is a Starlit shuttle that Jess kindly sent me. It's not strictly necessary for this project, though I'm thinking I could put all the beads onto one shuttle and less thread on the second one. I'm also thinking of making the bag in a size 10 thread, when the Starlit will be ideal.

Tatting the bag is quite slow going, but the result is very effective. A bead is put at the back of the hand for each ring and it stops the ring from closing completely. I think it looks like scales.

Thursday, January 3, 2013

Lark's Head Picot Join


My next challenge is to learn the Lark's head picot join - a bit of a mouthful that. I used Krystledawn's tutorial. My first attempt was spot on. Aha. My second was not. If you look carefully at the second ring from the left, you can see that I gave up and fudged it. I got the hang of it for a while, then produced some joins that looked right but didn't slide. No, that won't do. I think I have it now.

  Krystledawn created a tutorial that is clear and easy to follow. I especially like the summary of the technique at the end, so that once you more-or-less get the hang of it, you don't have to keep going through the whole tutorial. Thanks, Krystledawn.

The LHPJ is very neat, keeping the appearance of the double stitch.  Is the idea to use it as a join all the time? Or should it be used in specific circumstances? It must be slower than a 'normal' join, since it needs more movements. What do you think?

This is number 8 for my 25 Motif Challenge. 

Wednesday, January 2, 2013
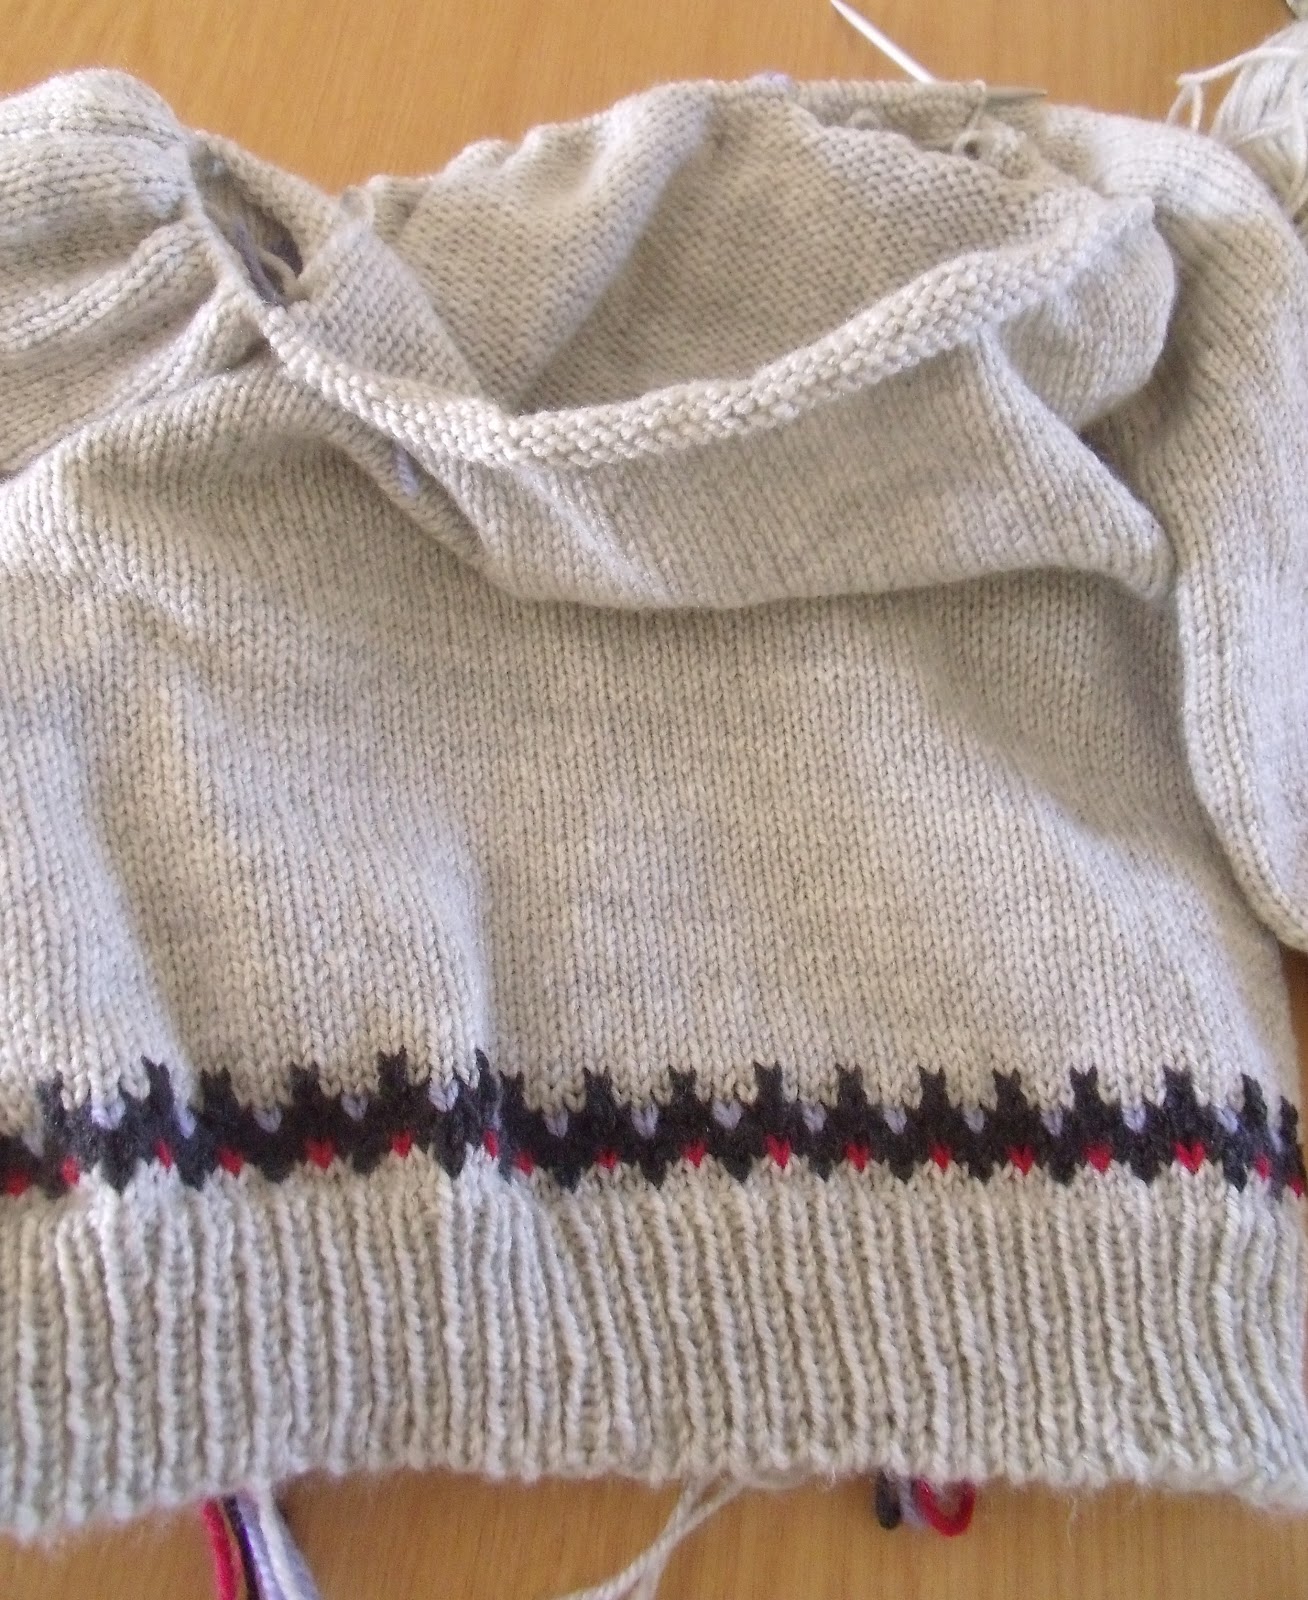
The Pattern

 The yoke is progressing, two stitches of this colour and three of that.

I found the pattern on Ravelry. It is a free pattern from  Lopi to celebrate their 20th anniversary. The yarn that I'm using is not as thick as Icelandic Lopi. I did a swatch which came out small, but in proportion. I'm using the stitch numbers for the second size with the lengths for the first size. This should, I hope, give me the a sweater of the smallest size. Lopi have some wonderful patterns, well worth looking at.

Tuesday, January 1, 2013

Yoked

The stitches from the body and the two sleeves are all on one circular needle. Now the interesting part begins, the multicoloured yoke. I have a chart to follow, showing which colour goes where.

Our power is still out, but the internet man was here this afternoon to put in a battery to keep the internet connection going. We are 'hosts' to an aerial that connects ten or so farmers to the internet, so when we are without power others are affected too. Let's hope the battery will keep everyone connected until we can get an electrician to come out and solve the problem.