Thursday, October 20, 2016
Butterfly Edging
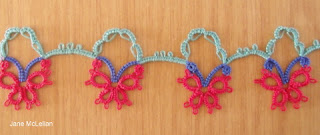
Edging 97 is a lot more original than Edging 96. I must admit I had to peer at the diagram for a while to work out how it was done. Then I practised the half open rings. Hmm, they boggled my mind a bit before I started, but turns out they're an easy alternative to split rings or SSSRs to get from A to B. The diagram and photo showed the little josephine rings in the same colour as the butterfly wings. I did that on the first two repeats, but wondered if it wouldn't make more sense to work them in the same colour as the antennae? So that's what I did on the second two repeats. There's a colour blip in the join and I had to do the SLT for the second one, but I think it works.
Subscribe to:
Post Comments (Atom)

Lovely edging and love your blue antennae with JRs - makes the butterfly take wing ! Beautifully worked and I cannot see any colour blip either.
ReplyDeleteGreat observation on the half-rings .... that is the exact answer I was looking for in my TWoT Hen n Chick Square question :-)
Before the tatted chain was invented, half-rings were used in their place (to span or bridge a length) with such lovely lacy effect !
Really? That's interesting. I haven't seen them before and couldn't see how they worked until I tried them.
Deleteit is beautiful and hard to believe that people long ago did this with less instructions and no internet.
ReplyDeleteLovely, I like how you changed antennas
ReplyDeleteI really like this edging, and I think your color change for the Josephine rings is much better. Is this one worked with 3 shuttles?
ReplyDeleteIt's a lovely edging and although I don't have the book, this edging was worth all the effort and working out you did well done
ReplyDeleteThat is a wonderful butterfly edging!!! :)
ReplyDeleteI agree with you about having the small rings the same as the antennae. :)
Brilliant detective work. I do like the changes you made to the JR.
ReplyDelete